
FAQ
Answers for Canadian SIP trunking
Search setup, porting, billing, and network questions from our operations knowledge base.
Use the following parameters when setting up an IXICA trunk:

Share
SR140 with IXICA SIP Trunk — Configuration FAQ
Configuration reference for deploying the Brooktrout SR140 fax-over-IP application on Windows against an IXICA Communications SIP trunk (inbound and outbound fax).
Who is this configuration guide for?
Technical staff and Value-Added Resellers (VARs) responsible for installing and operating the Brooktrout SR140 softFax application. It walks through the settings needed to register an SR140 deployment against an IXICA Communications SIP trunk for inbound and/or outbound fax.
The values shown are from a specific lab deployment and are illustrative only — substitute your own network addresses, phone number, and IXICA-issued credentials when you configure a live system.
What is IXICA and why pair it with SR140?
IXICA is a facilities-based Canadian CLEC offering enterprise-grade SIP trunking, with points-of-presence across Canada and the United States and access to most ratecenters in both countries. Their trunks are interop-tested against major PBX brands and are used by thousands of businesses.
The SR140 is a software-only fax-over-IP stack that terminates T.38 / G.711 fax calls on a Windows host. Pairing it with an IXICA SIP trunk gives you a fully virtual fax deployment — no fax boards, no analog lines — that reaches the PSTN through IXICA.
What does the reference deployment look like?
An SR140 fax-over-IP instance runs on a Windows PC that sits behind a firewall with a dedicated public IP address. The SR140 is configured to substitute its public IP for its private IP in SIP signaling and RTP/T.38 media (the NAT feature), so IXICA sees a routable address.
IXICA provisions a SIP trunk with a public telephone number, a UserID, and a password; the SR140 uses those to Register and Authenticate with the IXICA SBC. Registration is what lets IXICA learn the public IP that SR140 is currently sourcing traffic from.

Reference deployment: Windows PC running SR140 + FDTool, translated through a firewall to a public IP, registering to the IXICA SBC.
Diagram components:
- Windows PC running SR140 and the Brooktrout test tool
FDTool. - Network interfaces:
192.168.3.200— private IP of the SR140 system.72.44.49.58— public IP bound to that private IP for the fax server.
- IXICA SIP trunk: communicates via the public IP for SIP trunking and PSTN integration.
What information does IXICA provide for the SIP trunk?
IXICA configures the trunk to require SIP registration so it can (a) discover the public IP that SR140 is currently using and (b) authenticate every call. After provisioning, IXICA sends you the four values you need to plug into SR140:
| Field | Example value |
|---|---|
| Username | dialogicinterop |
| Password | xxxxxxxxxxxx |
| Proxy / Domain | sbc1.ixica.com |
| Your phone number | 16472762297 |
Keep the credentials handy — every one of them lands in the SR140 SIP configuration in the sections below.
What limitations should I plan for on the IXICA side?
Read this before tuning SR140. Two of the timeout values below exist specifically to work around IXICA's re-INVITE behavior — the defaults will not work reliably.
- IXICA supports T.38 version 0 only, with a maximum bit rate of 14,400 bps.
- On outbound calls from SR140, IXICA will not initiate the re-INVITE that switches the call from G.711 to T.38. SR140 has to perform the stitch itself. Do this by changing
Media Renegotiate Timeoutfrom its default of-1to4000 msec. - On some calls IXICA sends G.711 re-INVITEs before SR140 has had a chance to re-INVITE to T.38. Raising
Media Passthrough Timeoutto4000 msecstops those from interfering with the transition.
Where do I start the SR140 configuration?
All examples target an SR140 instance deployed on Windows.
- Launch the SR140 Configuration Tool.
- Switch the tool into Advanced Mode.
- Navigate: Call Control Parameters → Module 0x41: SR140 → IP Call Control Modules → SIP.
You will spend the rest of the setup inside two tabs: IP Parameters and T.38 Parameters.
How do I fill in the IP Parameters tab?
On the IP Parameters tab, set the following:
- Primary Proxy Server and Primary Registration Server — set both to the IXICA proxy/domain (in the reference deployment:
sbc1.ixica.com). - From Value — include the primary phone number IXICA provided and the IP address of the SR140 server. The display-name portion can be your company name or any label that fits your installation.
- Contact IPv4 Address — set to the IP address of the SR140 fax server.

SIP → IP Parameters tab, populated for the IXICA lab trunk.
How do I configure Registrar and Authentication (Advanced Parameters)?
Still on the IP Parameters tab, click Advance Parameters to expand the advanced section, then:
- Primary Registrar Address of Record —
<IXICA-Username>@<SR140-IP>:5060. For the reference deployment:dialogicinterop@192.168.1.200:5060. - Primary Registrar Server Username — the Username IXICA provided.
- Primary Registrar Server Password — the Password IXICA provided.

Advance Parameters — Registrar Address of Record, Username and Password.
Do I need to configure NAT settings?
If SR140 sits behind NAT with a dedicated public IP (the reference deployment), yes. Scroll to the end of the Advanced Parameters and set:
- Network Address Translation (NAT) SIP Address — the public IP address in use.
- Network Address Translation (NAT) Media Address — the same public IP address.
Depending on your network topology (for example, SR140 already on a routable public IP), this step may not be necessary.

Advance Parameters — NAT SIP Address and NAT Media Address set to the public IP.
Which T.38 Parameters need to change for IXICA?
Switch to the T.38 Parameters tab and set the values below so the SR140 negotiates T.38 within IXICA's supported envelope:
| Parameter | Value | Why |
|---|---|---|
| Maximum Bit Rate, bps | 14400 |
IXICA caps T.38 at 14.4 kbps. |
| Media Passthrough Timeout Outbound, mSec | 4000 |
Absorbs IXICA's early G.711 re-INVITEs so they do not derail the T.38 transition. |
| Media Renegotiate Delay Outbound, msec | 4000 |
Lets SR140 initiate the G.711 → T.38 stitch itself, since IXICA will not. |

T.38 Parameters tab — bit-rate cap and outbound timeouts tuned for IXICA.
What T.38 Advanced Parameters must match IXICA's SDP?
Click Advance Parameters on the T.38 tab and configure:
- Maximum T.38 version — set to
0(IXICA supports T.38 v0 only). - T.38 Fax Max Buffer, T.38 Datagram Send, and T.38 Datagram Receive — match whatever IXICA offers in its SDP. In the lab, that was
9792for the buffer and272for the datagram size.
You can read these values directly from the SDP body of IXICA's 200 OK answer to SR140's re-INVITE. If IXICA changes its offer, revisit these three fields.

T.38 Advance Parameters — v0, buffer 9792, datagrams 272.
Quick reference — every value at a glance
| Where | Setting | Value |
|---|---|---|
| IP Parameters | Primary Proxy Server | sbc1.ixica.com |
| IP Parameters | Primary Registration Server | sbc1.ixica.com |
| IP Parameters | From Value | IXICA phone number + SR140 IP |
| IP Parameters | Contact IPv4 Address | SR140 server IP |
| IP → Advance | Primary Registrar Address of Record | <user>@<SR140-IP>:5060 |
| IP → Advance | Primary Registrar Server Username / Password | Provided by IXICA |
| IP → Advance | NAT SIP Address / NAT Media Address | Public IP (if behind NAT) |
| T.38 Parameters | Maximum Bit Rate | 14400 bps |
| T.38 Parameters | Media Passthrough Timeout Outbound | 4000 ms |
| T.38 Parameters | Media Renegotiate Delay Outbound | 4000 ms |
| T.38 → Advance | Maximum T.38 version | 0 |
| T.38 → Advance | Fax Max Buffer / Datagram Send / Datagram Receive | 9792 / 272 / 272 (match IXICA SDP) |
Share
Integrate Yeastar P-Series Cloud Edition with IXICA Fax
By integrating Yeastar P-Series Cloud Edition with IXICA Fax, employees within your organization can send and receive faxes instantly and securely over the Internet - directly from their own Linkus Desktop or Web Client.
Introduction
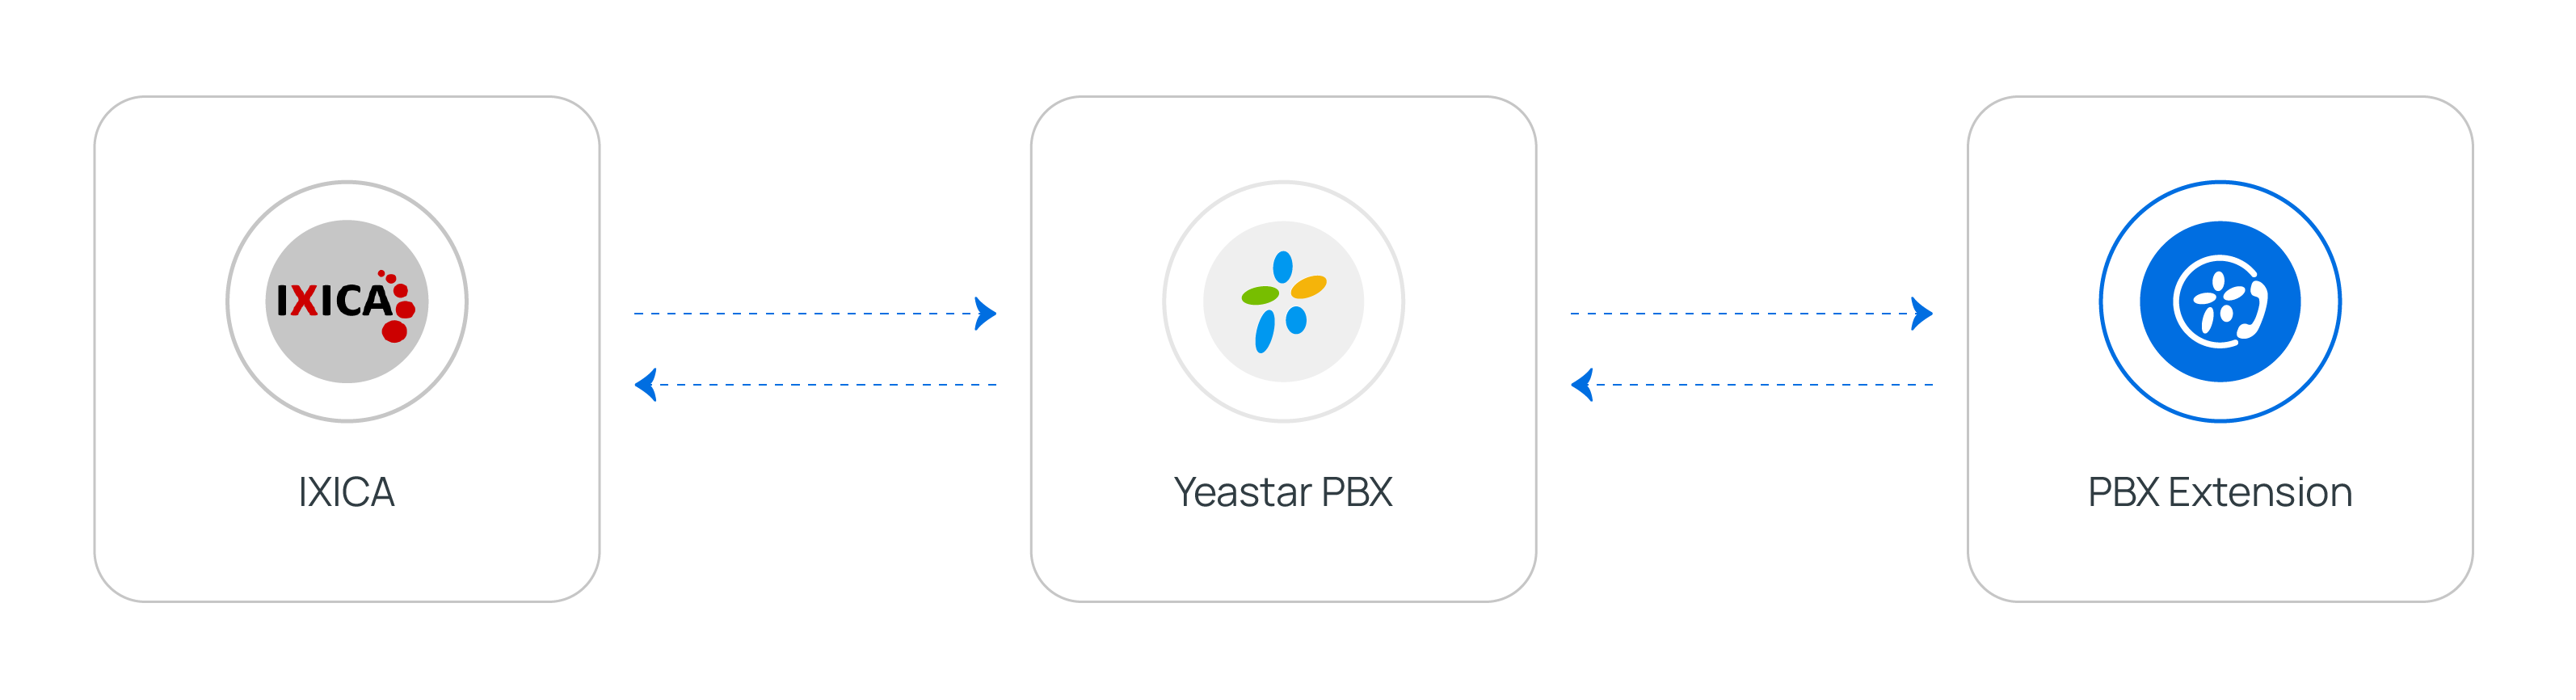
Yeastar P-Series Cloud Edition supports the integration with IXICA to enable Internet-based faxing, allowing PBX extension users to send and receive faxes through IXICA's reliable communications network.
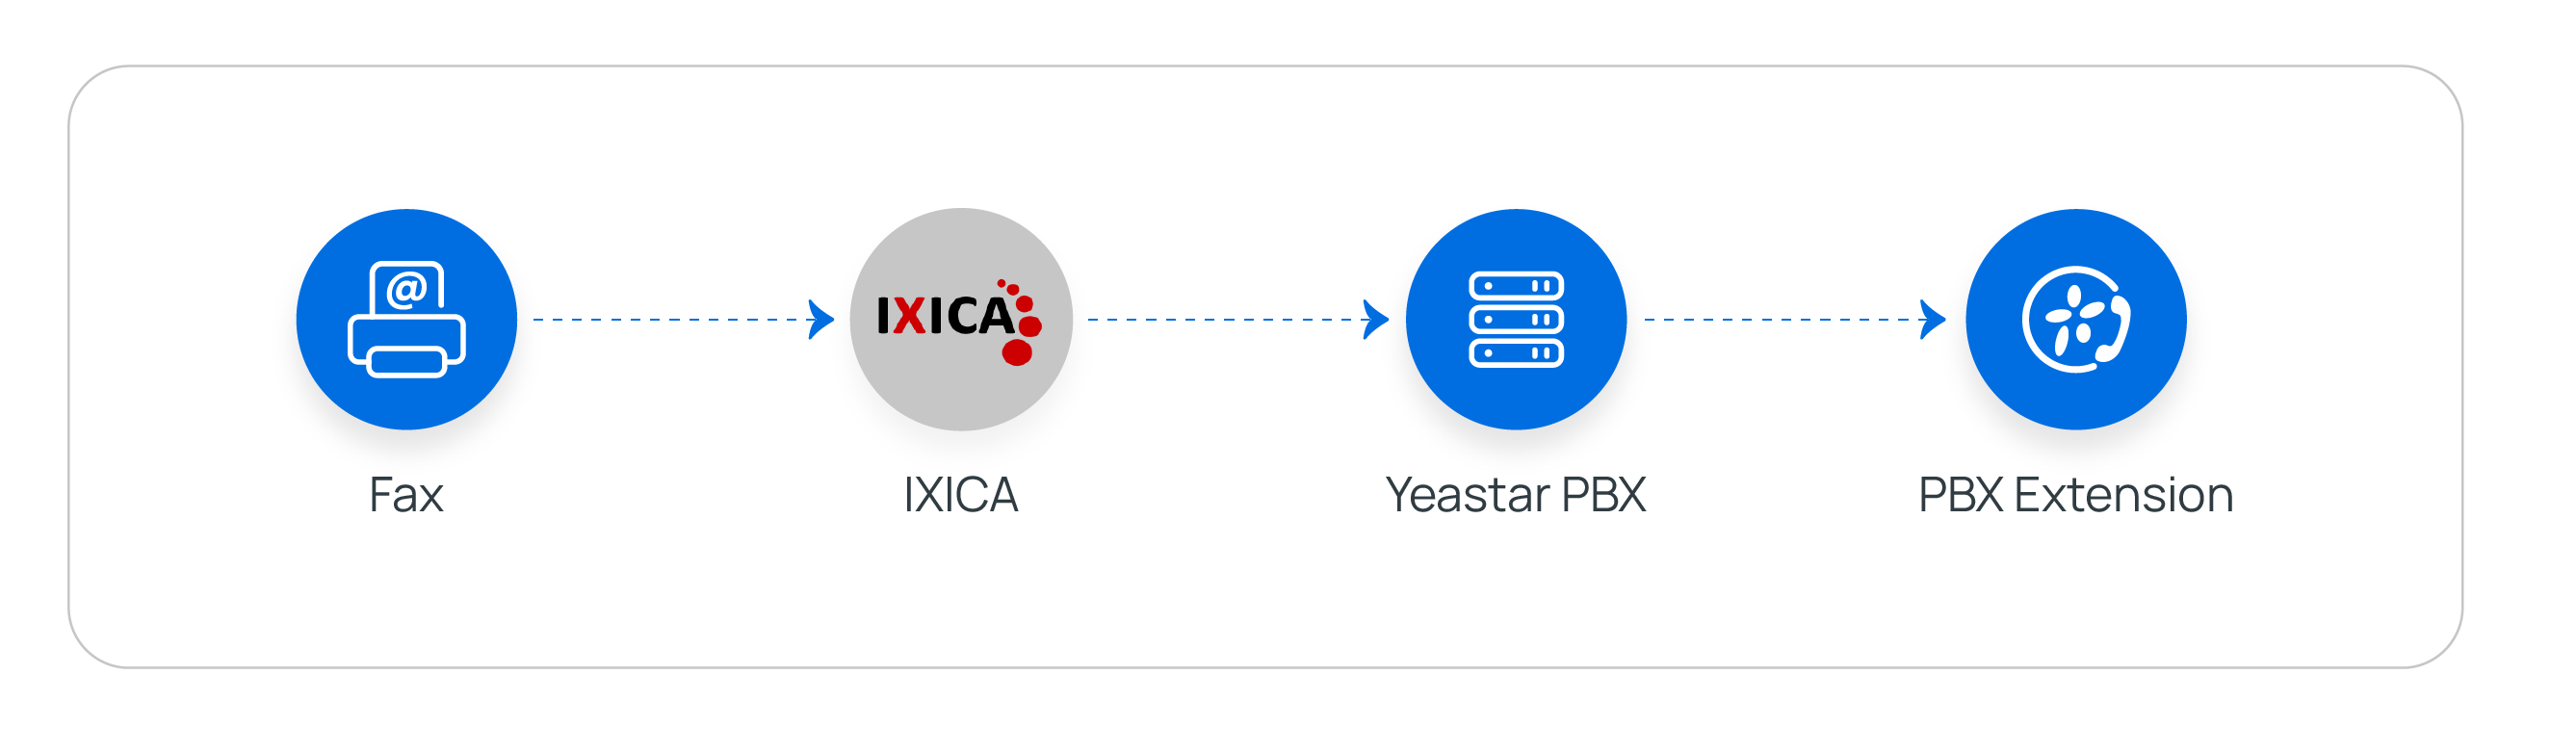
- When an extension user sends a fax from Linkus, Yeastar PBX calls IXICA API to submit the fax for delivery.
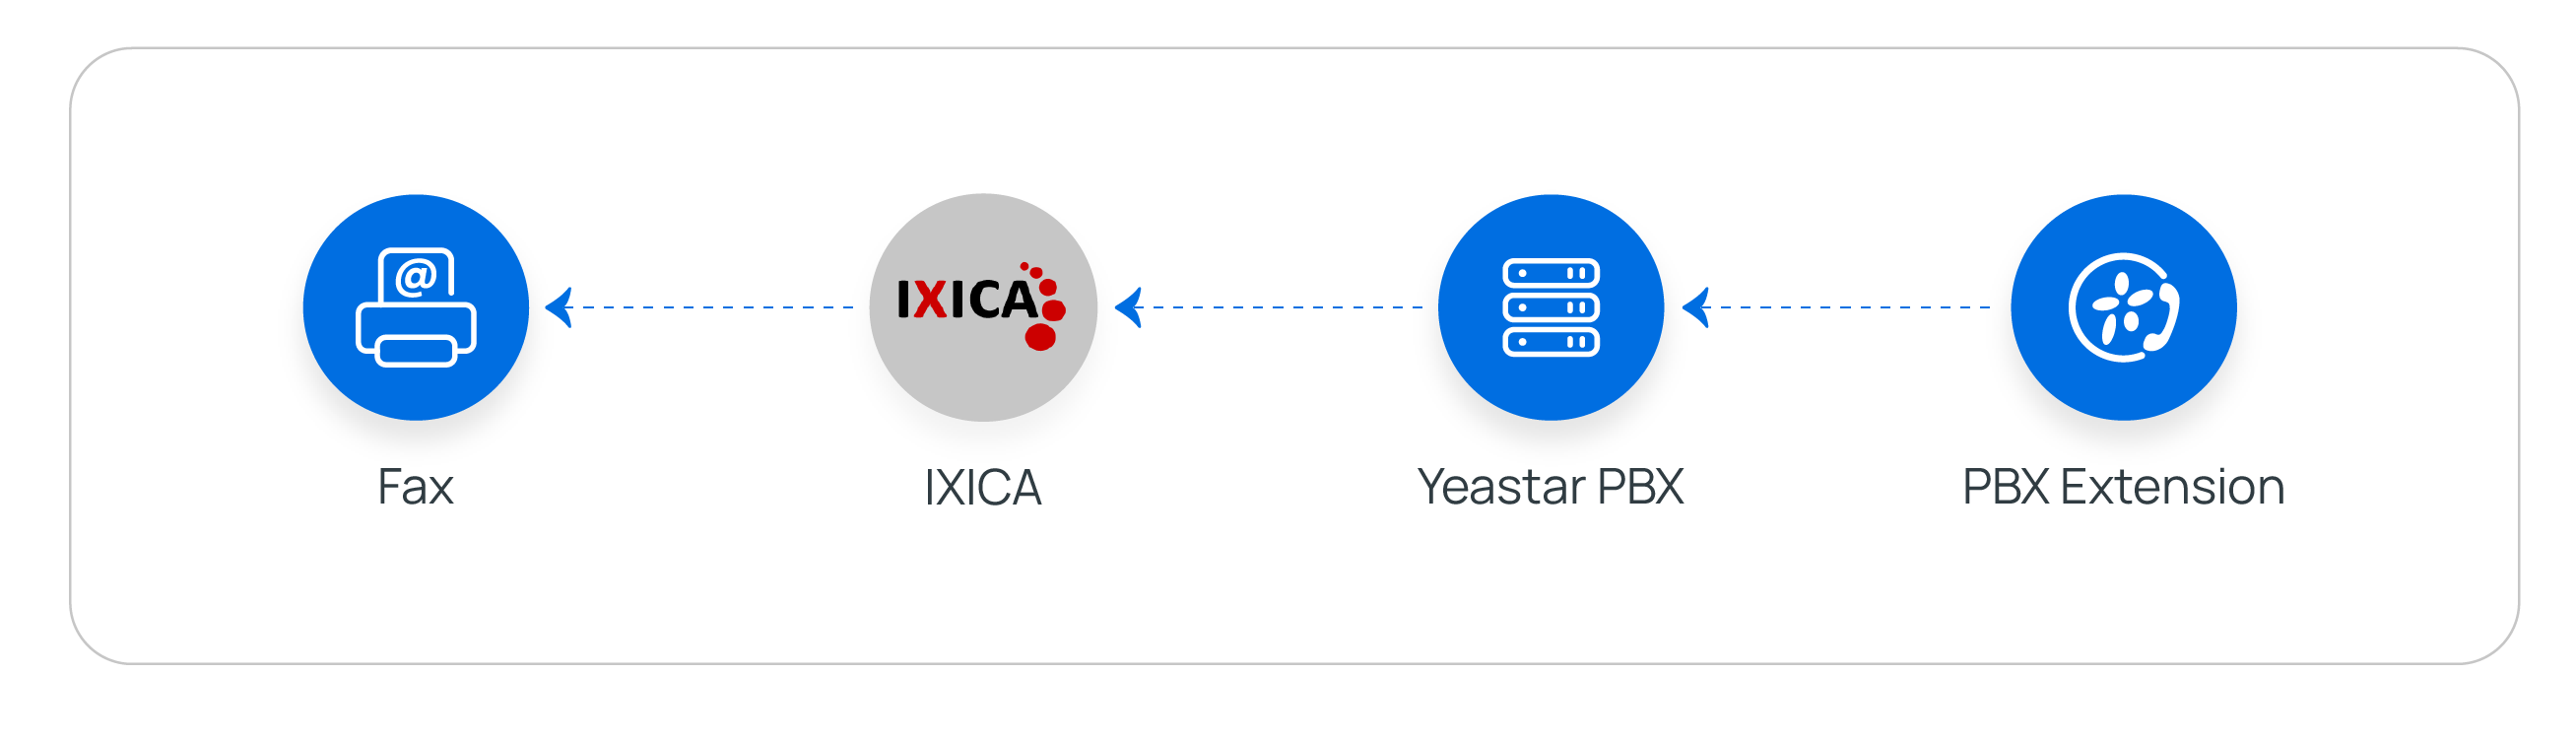
- When a fax arrives at IXICA fax number, IXICA sends a webhook notification to Yeastar PBX. PBX then retrieves the fax file via API and delivers it to the designated extension users' Linkus.
You can easily set up the integration by following the instructions below:
- Obtain Webhook URL from Yeastar PBX.
- Create the necessary resources and obtain the required credentials from IXICA.
- A Fax-enabled Phone Number for sending and receiving faxes.
- An API Key to authenticate your account and access IXICA API endpoints.
- Fill in the obtained credentials in Yeastar PBX, then configure fax-related settings.
Requirements
- Firmware: Version 84.21.0.117 or later
- Plan: Enterprise Plan or Ultimate Plan
Prerequisites
You have purchased fax number(s) from IXICA.
Step 1. Obtain Webhook URL from Yeastar PBX
Obtain a Webhook URL from Yeastar PBX first, which is required when you set up webhook notification on IXICA.
- Go to the fax integration page.
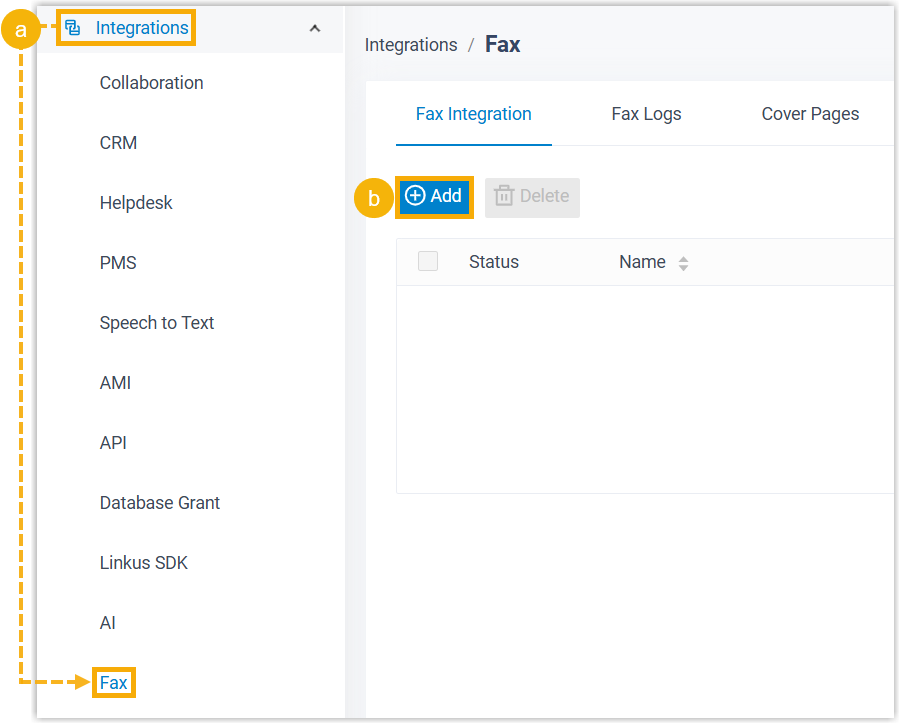
- Log in to PBX web portal, go to Integrations > Fax.
- Under Fax Integration tab, click Add.
- Obtain the Webhook URL for IXICA Fax.
Important:The URL will change once you leave the current page, please make sure you use the latest Webhook URL for the configuration on the service provider's customer portal.
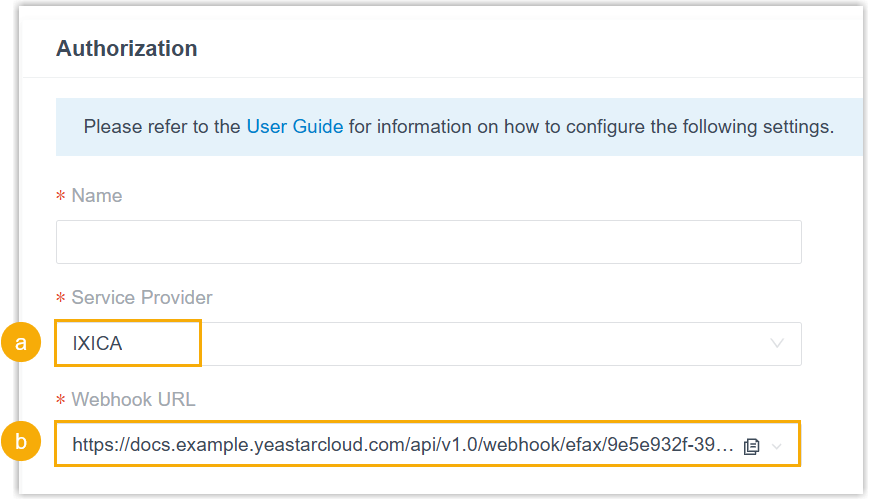
- In the Service Provider drop-down list, select IXICA.
- In the Webhook URL field, click
 to copy the URL and save it for later use.
Step 2. Obtain credentials from IXICA
Obtain the required credential from IXICA, so as to authenticate and authorize interactions between Yeastar PBX and IXICA.
- 1. Create an API key
-
- Access the account details page.
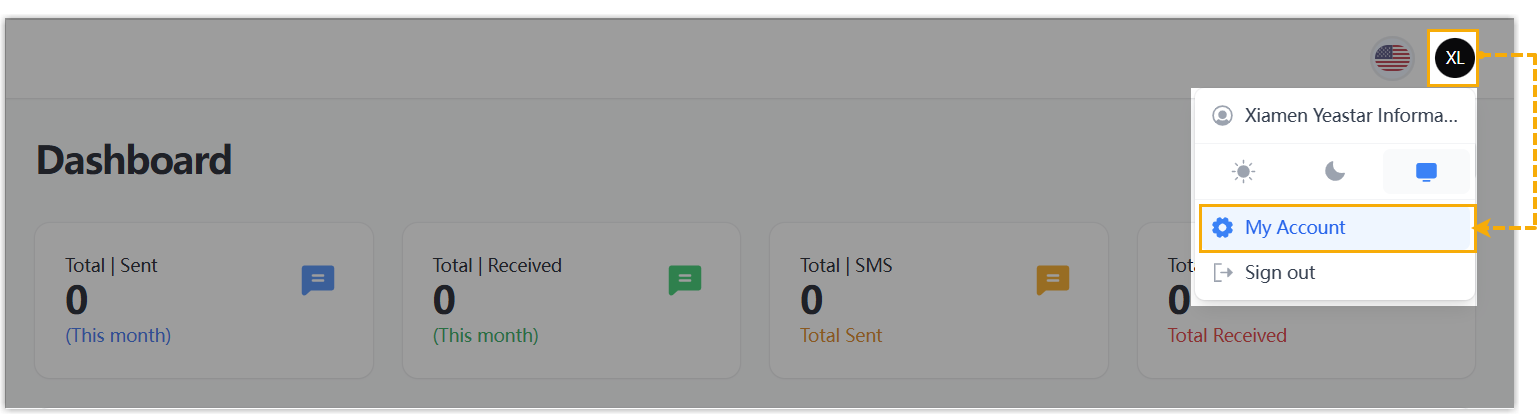
- Log in to IXICA portal.
- At the top-right corner of the webpage, click your account, then select My Account.
- Create an API key.
- Click Generate New above the API Key field.

A new API key is generated and displayed.
- Copy the API key and save it for later use.

- Click Generate New above the API Key field.
- Access the account details page.
- 2. Configure webhook for Yeastar PBX
-
- On the account details page, configure the webhook type.
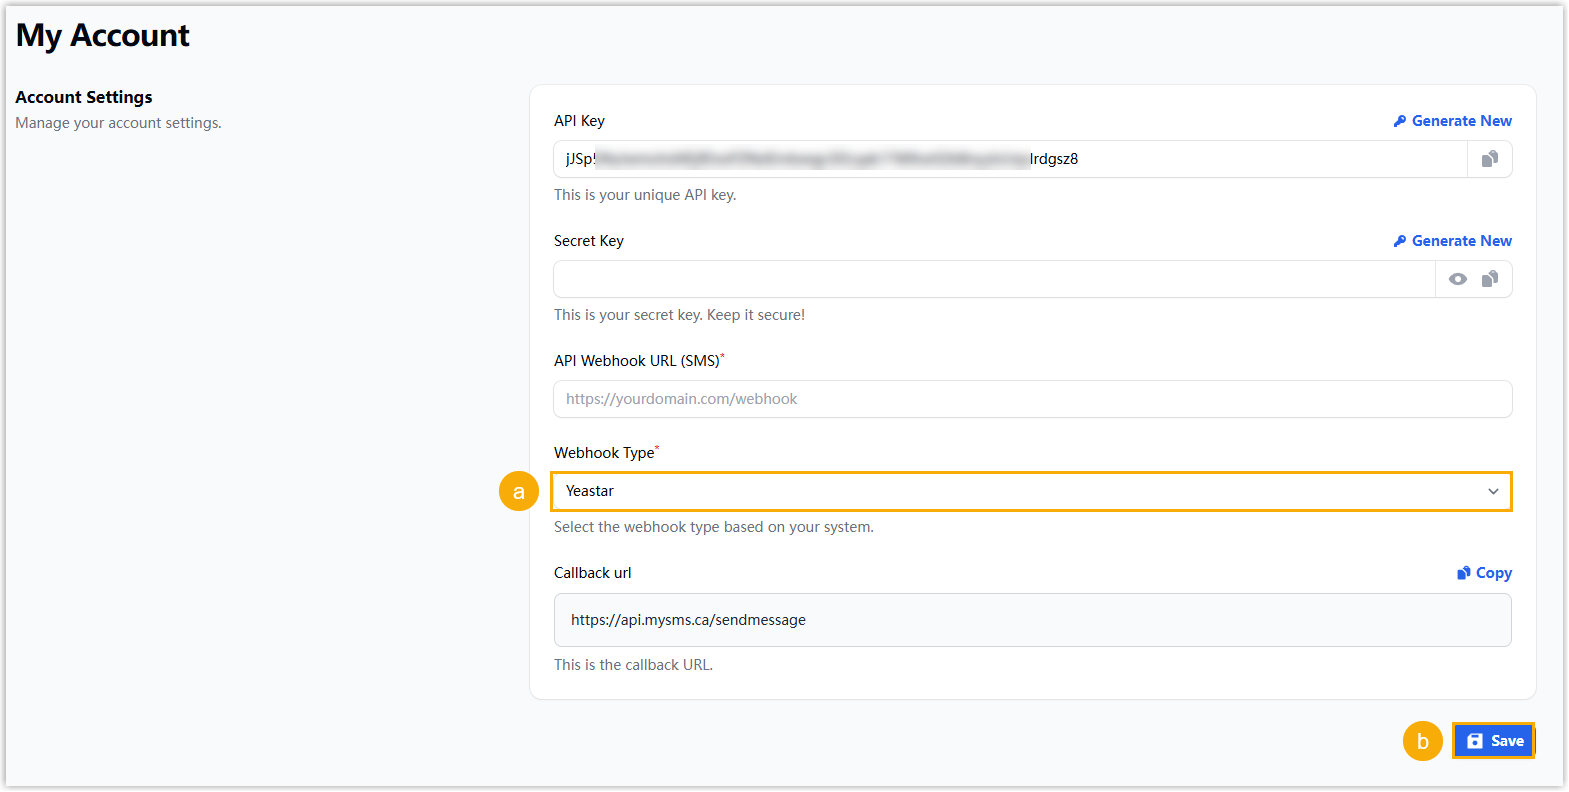
- In the Webhook Type drop-down list, select Yeastar.
- Click Save.
- Configure webhook URL for fax number.
- On the left navigation bar, go to Fax management > Fax Numbers, then click Manage Fax DID beside the desired number.
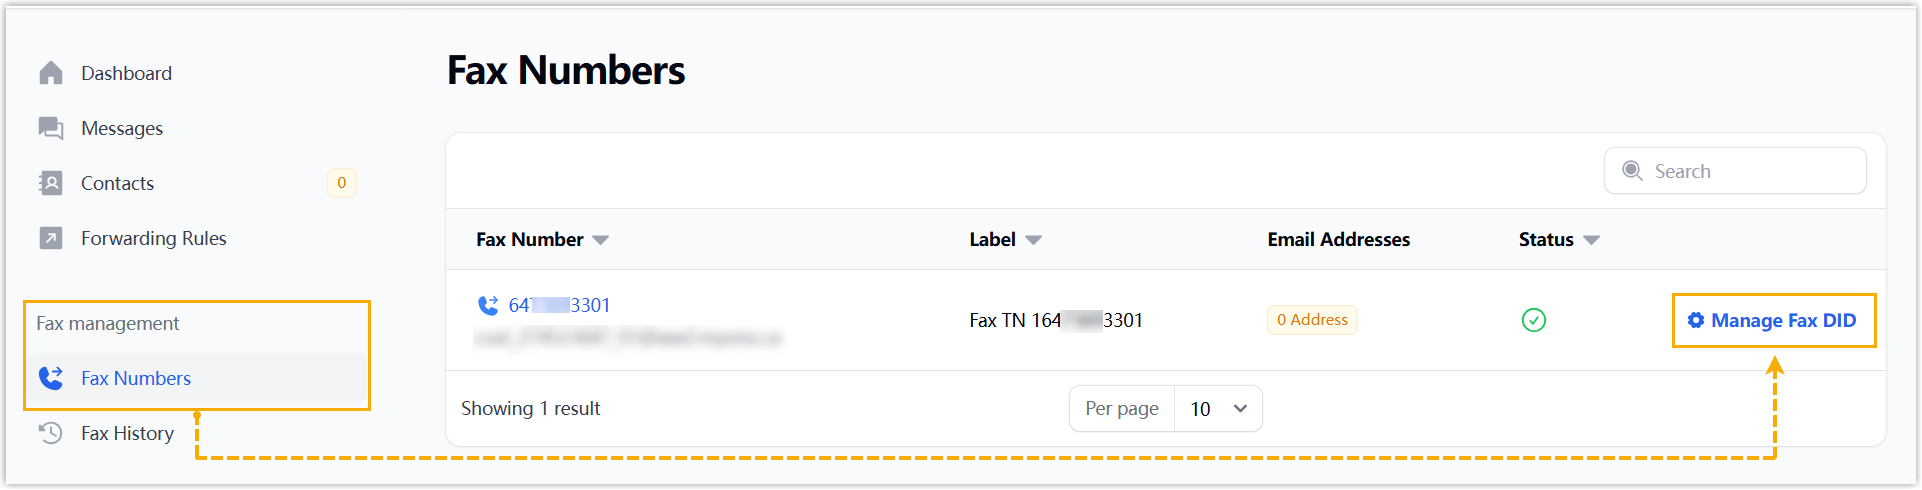
- On the number management page, scroll down to the Fax API Settings section.
- In the Customer Fax Webhook URL field, enter the webhook URL obtained from Yeastar PBX.
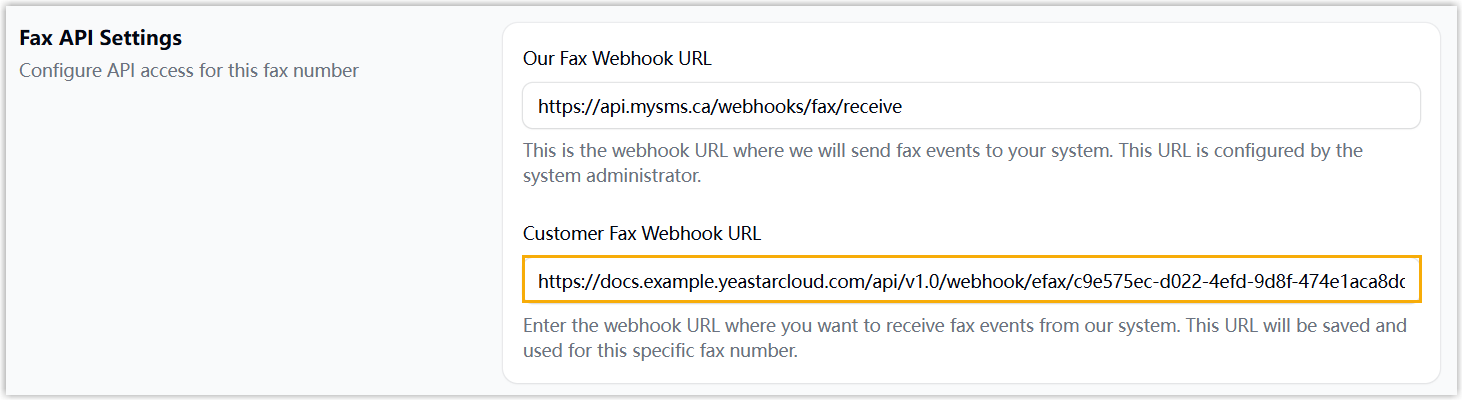
- Click Save changes.
- On the left navigation bar, go to Fax management > Fax Numbers, then click Manage Fax DID beside the desired number.
- On the account details page, configure the webhook type.
Step 3. Fill in credentials and configure fax settings on Yeastar PBX
On Yeastar PBX, fill in the credentials obtained from IXICA, then configure the fax-related settings to complete the fax integration.
- Go to the fax integration page.
- Log in to PBX web portal, go to Integrations > Fax.
- Under Fax Integration tab, click Add.
- In the Authorization section, complete the authorization settings.
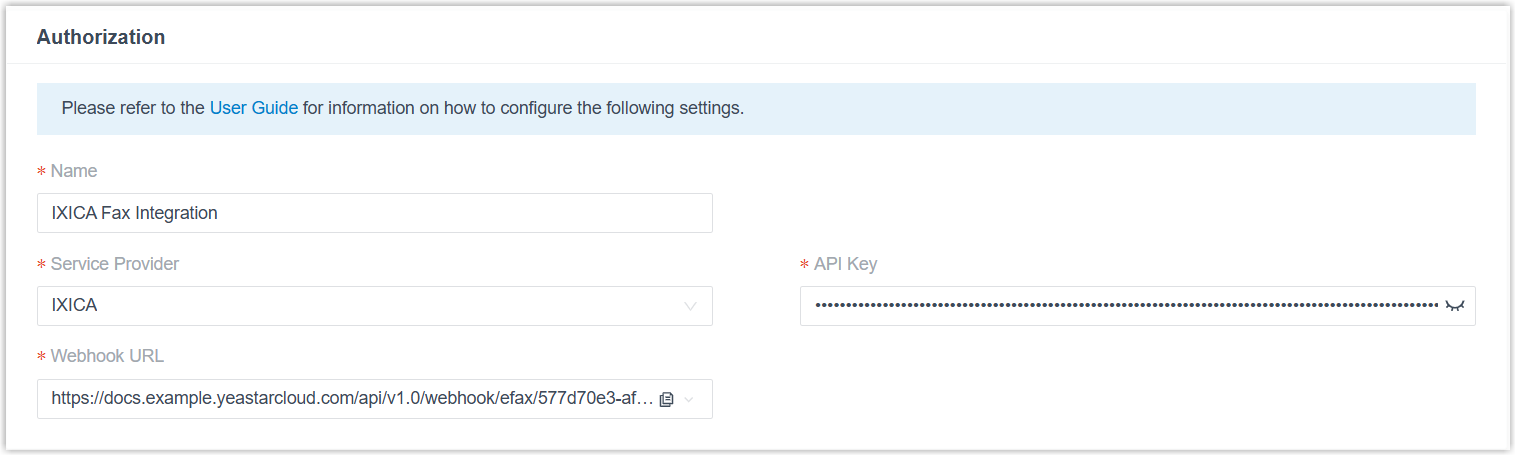
Setting Description Name Enter a name to help you identify the integration. Service Provider Select IXICA. API Key Paste the API key obtained from IXICA. - Optional: To forward inbound faxes as email attachments to designated addresses, perform the following operations.
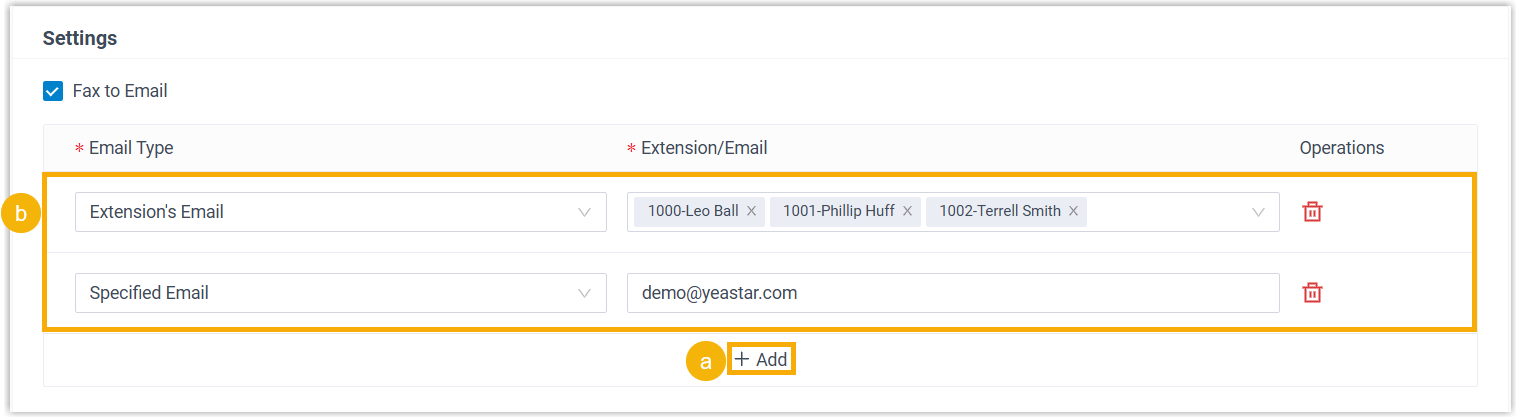
- In the Settings section, click Add.
Note:You can add up to 5 email entries.
- In the Email Type drop-down list, select the type of email address and complete the corresponding settings.
- Extension's Email: Send the inbound faxes as email attachments to extension users' mailboxes.
If you choose this option, select the desired extensions from the Extension/Email drop-down list.Note:Ensure the selected extensions have valid email addresses configured. Otherwise, users will not receive the emails.
- Specified Email: Send the inbound faxes as email attachments to a specified email address.
If you choose this option, enter a custom email address in the Extension/Email field.
- Extension's Email: Send the inbound faxes as email attachments to extension users' mailboxes.
- In the Settings section, click Add.
- Set fax number(s) and specify which extension users are authorized to send and receive faxes.
- In the Fax Number section, click Add.
- In the pop-up window, configure the following settings, then click Save.
Setting Description Fax Number Enter fax number. Example: 12498037994Important:Do not include a character+before the fax number, otherwise the fax delivery will fail.Fax Reception Destination Select extensions or extension groups that can receive inbound faxes. The designated users can view inbound faxes from Linkus Desktop or Web Client (Path: Fax Management > Fax).
Extensions Allowed to Send Fax Select extensions or extension groups that can send faxes. The designated users can send faxes from Linkus Desktop or Web Client (Path: Fax Management > Fax).
- To add more fax numbers, repeat steps a-b.
- Click Save.
Result
The Status displays  , indicating the integration with IXICA Fax has been set up successfully.

What to do next
- (Optional) Customize cover pages, which will be accessible to extension users when they send faxes.
For more information, see Add a Fax Cover Page.
- Instruct extension users on how to send faxes and check inbound faxes from their Linkus Desktop or Web Client.
For more information, see the following topics:
- Linkus Desktop Client: Send Faxes from Linkus Desktop Client and Check Faxes from Linkus Desktop Client.
- Linkus Web Client: Send Faxes from Linkus Web Client and Check Faxes from Linkus Web Client.
Share